The software only runs on Windows?!
So from my previous post, you might gather I’m a GNU Linux Open Source toting hippie socialist type. You’d be right :)
So I bought hardware who’s configuration software only works on Windows. It also runs under Wine with some caveats.
The Loxone Config software is an easy to use graphical user interface. Simply select components to work with, drag and drop them into pages and add blocks to make them do things.
The suggestion is that a page should be created for each room and category, ‘Bathroom lighting’ for example. The main reason to do this is so that components and blocks placed on a page have their room and category attributes correctly set, this matters for the UI presentation on mobile telephones or via the web UI.
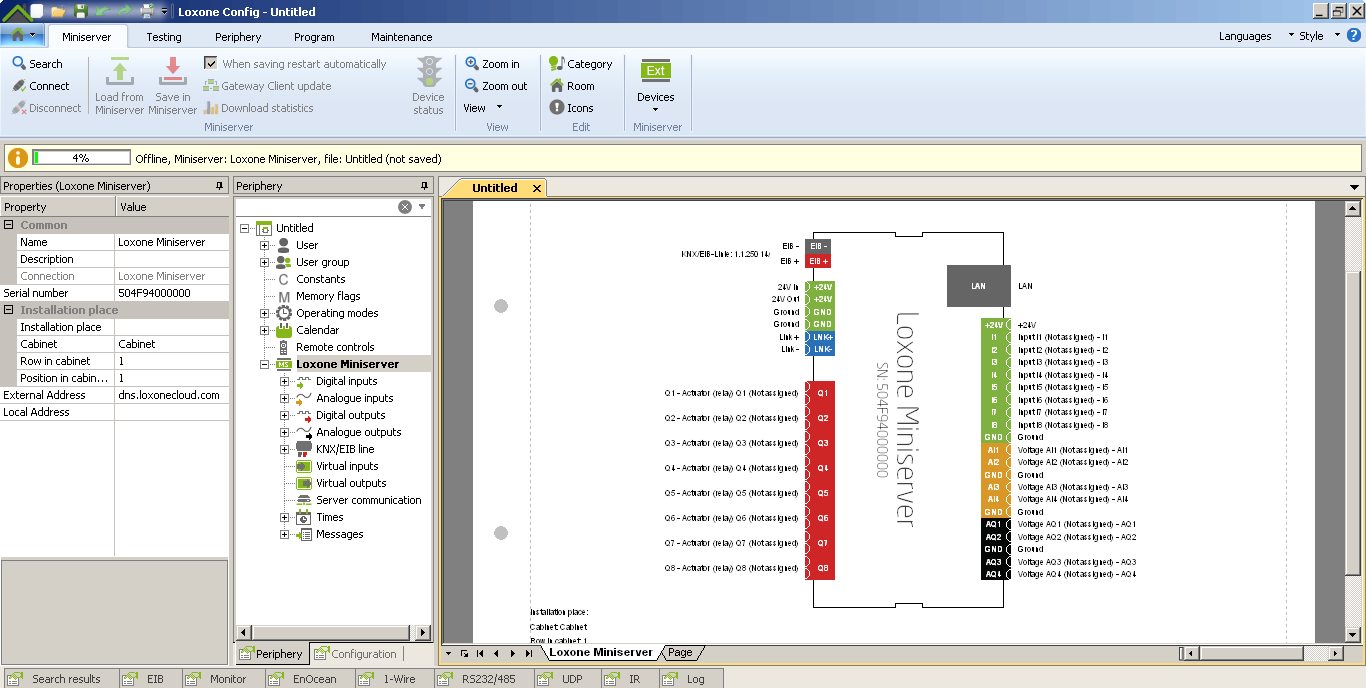
The components we’re interested in right now are:
- Digital inputs
- Digital outputs
- Analogue inputs
- Analogue outputs
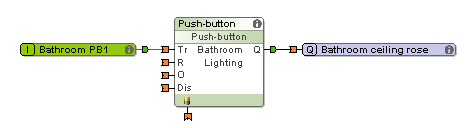
So let’s assume that we’re fitting a light in the bathroom, I’m going to ignore the discussion of switches for now as that’s a post on it’s own :) Our switch comes in on digital input 1 and our ceiling rose is attached to digital output 1. Let’s step through this. Create the page:
- Create a new page in Loxone Config
- Set name of the page to ‘Bathroom Lighting’
- Set category to ‘Lighting’
- Set room to ‘Bathroom’
Add the components to the page:
- Expand ‘Digital Inputs’ and drag ‘Input I1’ onto the page and drop it
- Set the name to ‘Bathroom PB1’ meaning bathroom push button #1We might be using a switch, in which case SW1 might be better. All of my switches are push buttons.
- Expand ‘Digital Outputs’ and drag ‘Actuator (relay) Q1’ onto the page and drop it
- Set the name to ‘Bathroom ceiling rose’
You’ll notice the room and category have been set for you on both components.For now, we don’t need to worry about any of the other settings, the defaults are fine.
At this point, one might connect the input directly to the output and expect it to work. Which it does. Kind of :) When you press the button, the light comes on and when you release it, the light will go off. This is probably not quite what you want.
Consulting the documentation didn’t seem to give a clear indication on how to do this, so digging around in the UI turned up the ‘Push-button’ which on testing does what we need.
So we now have a working light switch! Huzzah! What else do we need to know? This is the point that I started looking at the Loxone UK Youtube channel starting with the ‘Loxone Config for Beginners’ series of videos:
Part two is what we’ve configured above and the rest of the series talks through some of the things I’ve hinted at. The very last video suggests using a ‘Lighting controller’ rather than the simple example using a ‘Push-button’ component. There’s more detail on that in this video:
So my advice is take the time to watch the videos as it will save you time in trying to work it out on your own.My approach has been:
- Make use of a lighting controller for each room
- Each digital input push button is connected to a trigger input
- Each digital output light fitting is connected to the ‘Analogue output’ of the lighting controller
- Create a constant called ‘Keep state after power cycle’ with a value of 1
- Add the constant to all pages connecting it to the Remanence input of the lighting controller (looks like a battery)
- Bedrooms have both a ceiling light and a bedside light
All this is straight forward once you get the hang of how to do it. The annoyance here is that the lighting controller opens an additional dialogue when you double-click it. Or at least it does under Windows, under Wine and Linux, it does nothing. Which means that you can’t configure lighting scenes, outputs or any of the other details found there.
Here’s what you’re missing:
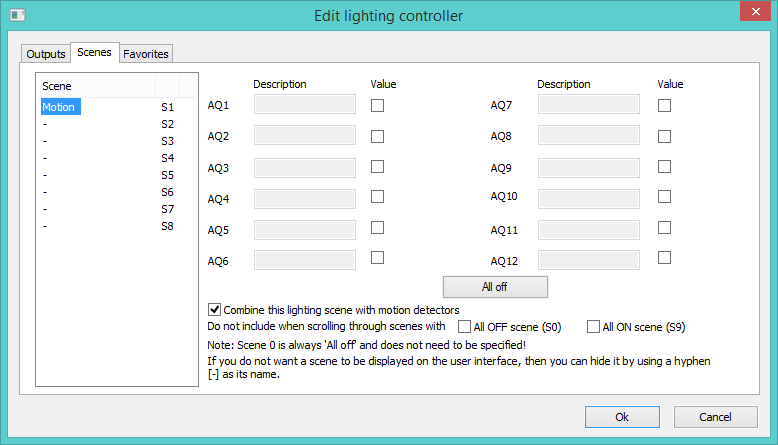
Setting scenes is only really significant if you have more than a couple of lights attached to it, though by default you seem to end up with scenes that you didn’t create which then appear in the web UI and on the Android app. You need to have the application under Windows to be able to remove the scenes you don’t want.
So to recap, the simple things are really simple once you know which bits you need to use for your particular situation. Watch the videos to learn about the basics and then freestyle from there. If you’re using Linux, Loxone Config will mostly work under Wine though specifically so far I’ve only found the ‘Lighting controller’ block that has this issue there may be other things that I’m missing and don’t know about.
Next we’ll discuss switches. Yes. A post all about switches. It’s important…. :)